サイト改装への道(16) 「npm installのオプション」

$ npm install gulp
昨日、そうやってgulpをローカルにインストールしました。

だがしかし、nmpのインストールコマンドには、オプションがあります。

–save-dev

開発時にのみ必要なライブラリをインストールする際に指定する。

–save

実行環境で必要なライブラリをインストールする際に指定する。

これらのオプションを付けておくと、package.jsonが変更され、nmp installだけで必要なパッケージをインストールしてくれるという仕組み。

だが、packege.json自体を作る手順を踏んでないと働かないらしい。
なので、まず初期化。

$ npm init
This utility will walk you through creating a package.json file.
It only covers the most common items, and tries to guess sensible defaults.
See `npm help json` for definitive documentation on these fields
and exactly what they do.
Use `npm install –save` afterwards to install a package and
save it as a dependency in the package.json file.
Press ^C at any time to quit.
name: (yii2-app-advanced)
version: (1.0.0)
description:
entry point: (gulpfile.js)
test command:
git repository:
keywords:
author:
license: (ISC)
About to write to d:xampphtdocsyii2-app-advancedpackage.json:
{
  “name”: “yii2-app-advanced”,
  “version”: “1.0.0”,
  “description”: “Yii 2 Advanced Project Template ===============================”,
  “main”: “gulpfile.js”,
  “directories”: {
    “test”: “tests”
  },
  “scripts”: {
    “test”: “echo “Error: no test specified” && exit 1″
  },
  “author”: “”,
  “license”: “ISC”
}

Is this ok? (yes) yes
最後のyesを入力した以外は、そのままEnterキー。
この初期化で、次のようなファイルpackege.jsonが生成された。

{
  “name”: “yii2-app-advanced”,
  “version”: “1.0.0”,
  “description”: “Yii 2 Advanced Project Template ===============================”,
  “main”: “gulpfile.js”,
  “directories”: {
    “test”: “tests”
  },
  “scripts”: {
    “test”: “echo “Error: no test specified” && exit 1″
  },
  “author”: “”,
  “license”: “ISC”
}

その後にgulpをsave-devでインストール。

$ npm install –save-dev gulp
npm WARN package.json yii2-app-advanced@1.0.0 No repository field.
gulp@3.9.0 node_modulesgulp
├── interpret@0.6.2
├── pretty-hrtime@1.0.0
├── deprecated@0.0.1
├── archy@1.0.0
├── tildify@1.1.0 (os-homedir@1.0.0)
├── minimist@1.1.1
├── v8flags@2.0.7 (user-home@1.1.1)
├── chalk@1.0.0 (escape-string-regexp@1.0.3, ansi-styles@2.0.1, supports-color@1.3.1, has-ansi@1.0.3, strip-ansi@2.0.1)
├── semver@4.3.6
├── orchestrator@0.3.7 (stream-consume@0.1.0, sequencify@0.0.7, end-of-stream@0.1.5)
├── liftoff@2.1.0 (extend@2.0.1, rechoir@0.6.1, flagged-respawn@0.3.1, resolve@1.1.6, findup-sync@0.2.1)
├── vinyl-fs@0.3.13 (graceful-fs@3.0.8, strip-bom@1.0.0, defaults@1.0.2, vinyl@0.4.6, mkdirp@0.5.1, through2@0.6.5, glob-stream@3.1.18, glob-watcher@0.0.6)
└── gulp-util@3.0.5 (array-differ@1.0.0, array-uniq@1.0.2, lodash._reinterpolate@3.0.0, beeper@1.1.0, lodash._reescape@3.0.0, object-assign@2.1.1, lodash._reevaluate@3.0.0, replace-ext@0.0.1, vinyl@0.4.6, lodash.template@3.6.1, through2@0.6.5, multipipe@0.1.2, dateformat@1.0.11)

そうすると、packege.jsonは、次のように更新されている。

{
  “name”: “yii2-app-advanced”,
  “version”: “1.0.0”,
  “description”: “Yii 2 Advanced Project Template ===============================”,
  “main”: “gulpfile.js”,
  “directories”: {
    “test”: “tests”
  },
  “scripts”: {
    “test”: “echo “Error: no test specified” && exit 1″
  },
  “author”: “”,
  “license”: “ISC”,
  “devDependencies”: {    “gulp”: “^3.9.0”  }}
うん。増えた。
これでnode_modulesを配らなくても、npm installで開発環境をインストールしてくれる。
という事かなぁ???

サイト改装への道(15) 「WindowsでYii2+gulp」

Yii2のテンプレートをインストールしたら、そこにgulpをインストールする。
グローバルインストールは終わっているので、GitBashで確認。

$ gulp -v
[19:31:28] CLI version 3.9.0
カレントフォルダをテンプレートのフォルダに変更。

$ cd c:/xampp/htdocs/yii2-app-advanced
ローカルインストールが終わってないと、次のようにエラーとなる。

$ gulp
[25:19:04] Local gulp not found in ***
[25:19:04] Try running: npm install gulp
そして、gulpをローカルインストール。

$ npm install gulp
gulp@3.9.0 node_modulesgulp
├── pretty-hrtime@1.0.0
├── interpret@0.6.2
├── deprecated@0.0.1
├── archy@1.0.0
├── minimist@1.1.1
├── v8flags@2.0.7 (user-home@1.1.1)
├── tildify@1.1.0 (os-homedir@1.0.0)
├── chalk@1.0.0 (ansi-styles@2.0.1, escape-string-regexp@1.0.3, supports-color@1.3.1, strip-ansi@2.0.1, has-ansi@1.0.3)
├── semver@4.3.6
├── orchestrator@0.3.7 (stream-consume@0.1.0, sequencify@0.0.7, end-of-stream@0.1.5)
├── liftoff@2.1.0 (extend@2.0.1, rechoir@0.6.1, flagged-respawn@0.3.1, resolve@1.1.6, findup-sync@0.2.1)
├── gulp-util@3.0.5 (array-differ@1.0.0, array-uniq@1.0.2, object-assign@2.1.1, lodash._reescape@3.0.0, beeper@1.1.0, lodash._reinterpolate@3.0.0, lodash._reevaluate@3.0.0, replace-ext@0.0.1, vinyl@0.4.6, lodash.template@3.6.1, through2@0.6.5, multipipe@0.1.2, dateformat@1.0.11)
└── vinyl-fs@0.3.13 (graceful-fs@3.0.8, defaults@1.0.2, strip-bom@1.0.0, vinyl@0.4.6, mkdirp@0.5.1, through2@0.6.5, glob-stream@3.1.18, glob-watcher@0.0.6)
さて、再度gulp起動!

$ gulp
[25:27:29] No gulpfile found
そりゃあ、そうだ。
以下の内容のファイルを、gulpfile.jsとして、yii2-app-advancedフォルダに作って、

var gulp = require(‘gulp’);
gulp.task(‘default’, function() {
console.log(“Hello World!”);
});
再度、

$ gulp
[25:44:04] Using gulpfile c:xampphtdocsyii2-app-advancedgulpfile.js
[25:44:04] Starting ‘default’…
Hello World!
[25:44:04] Finished ‘default’ after 2.62 ms
よし!

Browsersyncは、いつになったら?

サイト改装への道(14) 「Yii2のインストール Windows編」

Windowsにgulpを入れてみたので、そのままyii2も入れてしまおう。

GitBashを起動して、カレントディレクトリをxamppのhtdocsに移動。

$ cd c:/xampp/htdocs
そして、yii2の上級テンプレートを作成。

$ composer create-project –prefer-dist yiisoft/yii2-app-advanced
Installing yiisoft/yii2-app-advanced (2.0.4)
  – Installing yiisoft/yii2-app-advanced (2.0.4)
    Downloading: 100%
Created project in C:xampphtdocsyii2-app-advanced
Loading composer repositories with package information
Installing dependencies (including require-dev)
  – Installing yiisoft/yii2-composer (2.0.3)
    Loading from cache
  – Installing ezyang/htmlpurifier (v4.6.0)
    Loading from cache
  – Installing cebe/markdown (1.1.0)
    Loading from cache
  – Installing bower-asset/jquery (2.1.4)
    Loading from cache
  – Installing bower-asset/jquery.inputmask (3.1.63)
    Loading from cache
  – Installing bower-asset/punycode (v1.3.2)
    Loading from cache
  – Installing bower-asset/yii2-pjax (v2.0.4)
    Loading from cache
  – Installing yiisoft/yii2 (2.0.4)
    Loading from cache
  – Installing swiftmailer/swiftmailer (v5.4.1)
    Loading from cache
  – Installing yiisoft/yii2-swiftmailer (2.0.4)
    Loading from cache
  – Installing yiisoft/yii2-codeception (2.0.4)
    Loading from cache
  – Installing bower-asset/bootstrap (v3.3.5)
    Downloading: 100%
  – Installing yiisoft/yii2-bootstrap (2.0.4)
    Loading from cache
  – Installing yiisoft/yii2-debug (2.0.4)
    Loading from cache
  – Installing bower-asset/typeahead.js (v0.10.5)
    Loading from cache
  – Installing phpspec/php-diff (v1.0.2)
    Loading from cache
  – Installing yiisoft/yii2-gii (2.0.4)
    Loading from cache
  – Installing fzaninotto/faker (v1.5.0)
    Loading from cache
  – Installing yiisoft/yii2-faker (2.0.3)
    Loading from cache
fzaninotto/faker suggests installing ext-intl (*)
Writing lock file
Generating autoload files
あれ、もう終わり?

上級テンプレートなので、あとは初期化して、

$ php yii2-app-advanced/initYii Application Initialization Tool v1.0
Which environment do you want the application to be initialized in?
  [0] Development
  [1] Production
  Your choice [0-1, or “q” to quit] 0
  Initialize the application under ‘Development’ environment? [yes|no] yes
  Start initialization …
   generate backend/config/main-local.php
   generate backend/config/params-local.php
   generate backend/web/index-test.php
   generate backend/web/index.php
   generate common/config/main-local.php
   generate common/config/params-local.php
   generate console/config/main-local.php
   generate console/config/params-local.php
   generate frontend/config/main-local.php
   generate frontend/config/params-local.php
   generate frontend/web/index-test.php
   generate frontend/web/index.php
   generate yii
   generate cookie validation key in backend/config/main-local.php
   generate cookie validation key in frontend/config/main-local.php
      chmod 0777 backend/runtime
      chmod 0777 backend/web/assets
      chmod 0777 frontend/runtime
      chmod 0777 frontend/web/assets
      chmod 0755 yii
      chmod 0755 tests/codeception/bin/yii
  … initialization completed.
ちなみに開発環境としての初期化ね。

次に、MySQLデータベース上に、ユーザーとデータベースを作成し、次のファイルをユーザ名とデータベース名に合わせて編集。
c:/xampp/htdocs/yii2-app-advanced/common/config/main-local.php

return [
    ‘components’ => [
        ‘db’ => [
            ‘class’ => ‘yiidbConnection’,
            ‘dsn’ => ‘mysql:host=localhost;dbname=yii’,
            ‘username’ => ‘yii’,
            ‘password’ => ‘yii’,
            ‘charset’ => ‘utf8’,
        ],
        ‘mailer’ => [
            ‘class’ => ‘yiiswiftmailerMailer’,
            ‘viewPath’ => ‘@common/mail’,
            // send all mails to a file by default. You have to set
            // ‘useFileTransport’ to false and configure a transport
            // for the mailer to send real emails.
            ‘useFileTransport’ => true,
        ],
    ],
];

データベースを初期化!

$ php yii2-app-advanced/yii migrate
Yii Migration Tool (based on Yii v2.0.4)
Creating migration history table “migration”…Done.
Total 1 new migration to be applied:
        m130524_201442_init
Apply the above migration? (yes|no) [no]:yes
*** applying m130524_201442_init
    > create table {{%user}} … done (time: 0.313s)
*** applied m130524_201442_init (time: 0.348s)

Migrated up successfully.

さあ、上級の世界に。

Dynabook T551/59DBS (2011年秋冬)を分解する

Dynabookの電源が入らないとのことで、ばらしてみる。

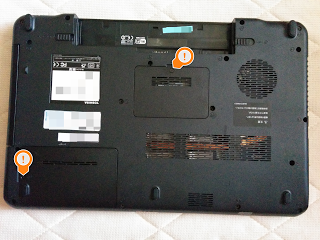
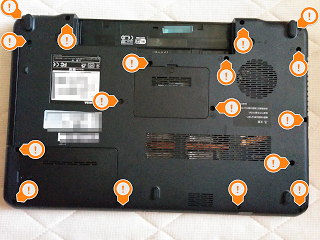
で、裏面にはネジがびっしり。

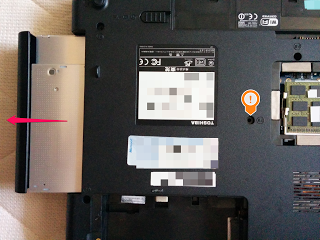
CDドライブは、図のネジ1本で大丈夫。

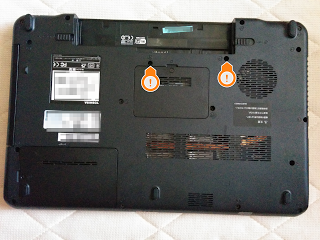
HDDとメモリは1本ずつ。

メモリはこんなの。

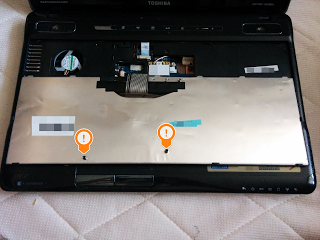
キーボードは2本。

キーボード上部からこじ開ける。裏返してねじ穴確認。

キーボードを外すには裏のケーブルシートを引き抜く。左右の白いプラスチック部分を引いて緩めてからね。

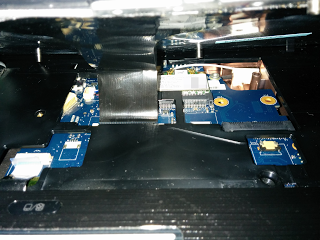
上面カバーを外すには図のねじ2本と、コネクターをいろいろ外す。

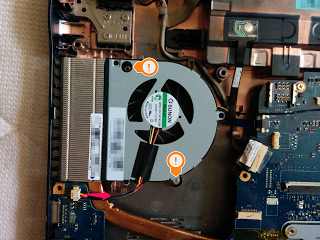
マザーボードを外すには、先にファンを取らねばならん。

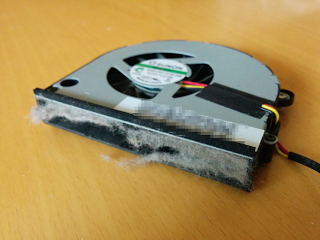
やはりファンは埃まみれ。

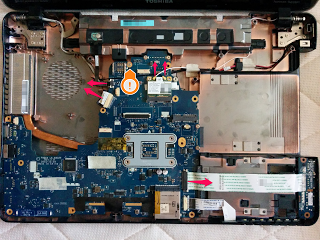
ねじ一本とケーブルあちこち抜いてマザーボードも攻略成功。

ちなみに、本題は、「電源が入らない」故障の対策だったが、専門家じゃないので原因は分かりませんでした。
まだまだ青いな。

サイト改装への道(13) 「Windowsでgulp」

Windowsでgulpを使ってBrowsersyncしたい。

まずは、次のページからGitのWindows用セットアップファイルをダウンロードする。
http://git-scm.com/downloads/
EXEを実行して、インストール。標準設定でOK?

続いて、次のページからnode.jsのWindows用セットアップファイルをダウンロードする。
https://nodejs.org/download/
msi、またはEXEを実行して、インストール。標準設定でOK?

まず、GitBashのショートカットのプロパティを開いて、詳細設定で管理者で実行するようにチェックしておく。

そして、GitBashを起動。
次のコマンドでgulpをインストール

$ npm install -g gulp

で、インストールは終わった。
あとは、Browsersyncを目指す!